Author_Hendry")
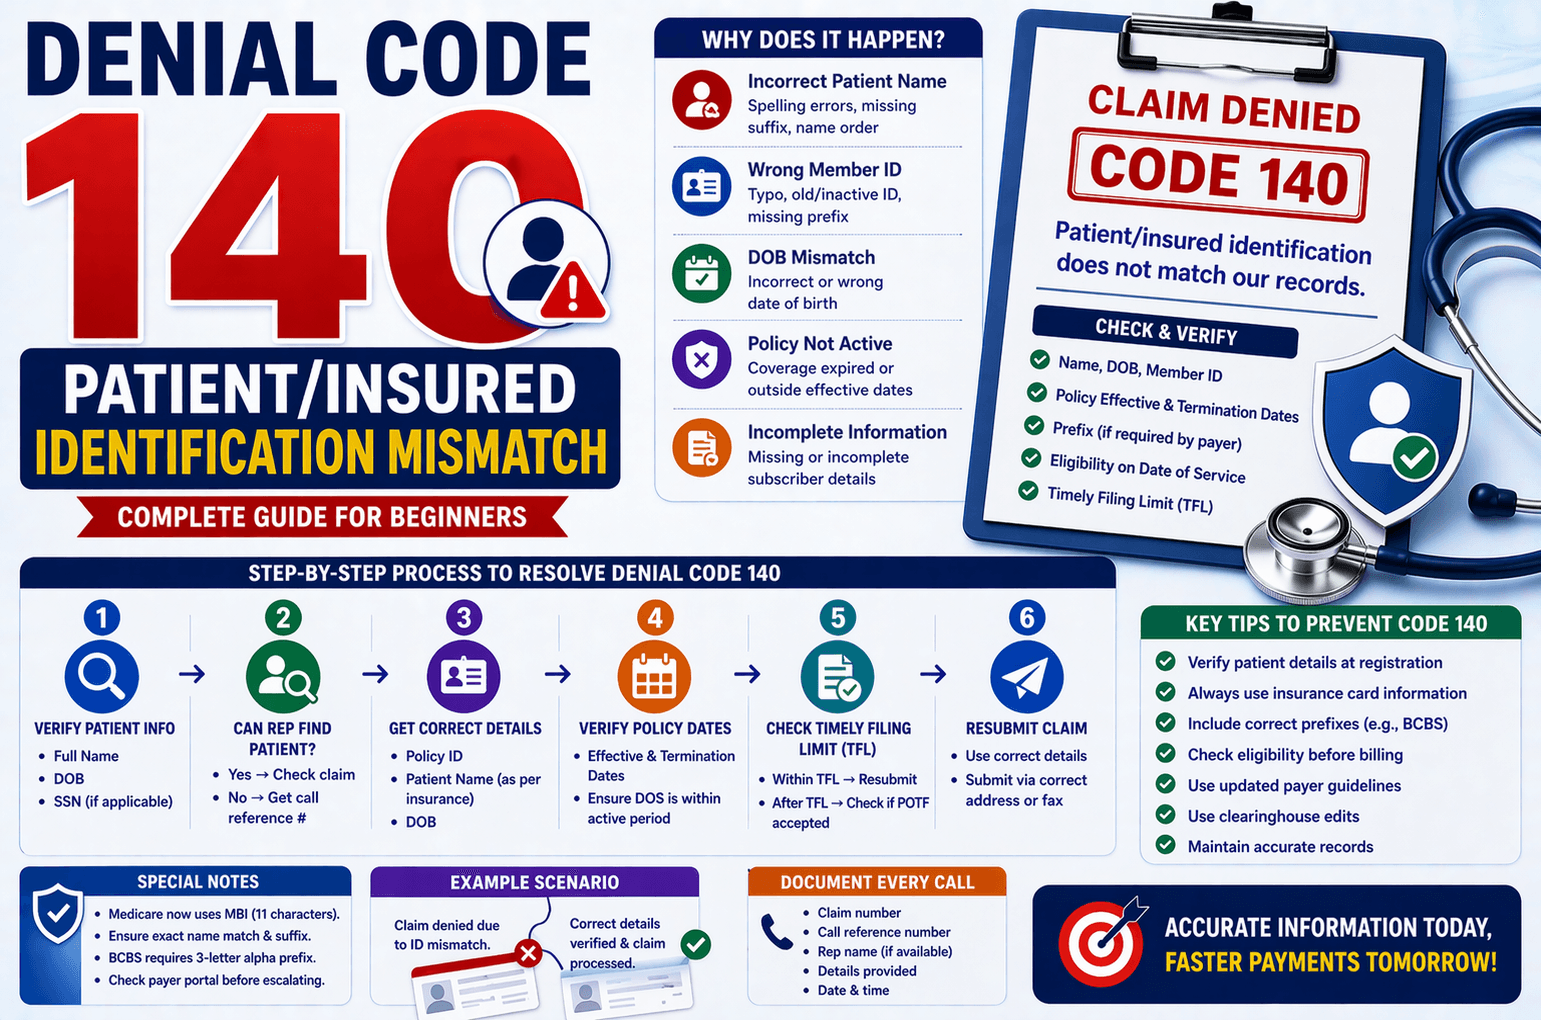
In medical billing, claim denials are a common challenge, and one of the most frequent issues is Denial Code 140. This denial occurs when the patient or insured health identification number and name do not match in the payer’s system.
For beginners in medical billing or revenue cycle management (RCM), this can seem confusing. However, with a structured approach and proper verification steps, this denial can be resolved efficiently.
This guide will break down everything you need to know—what the denial means, why it happens, how to handle it, and best practices to prevent it.
What is Denial Code 140?
Denial Code 140 indicates that:
The insurance payer is unable to identify the patient because the submitted details (name, ID, DOB, etc.) do not match their records.
In simple terms:
Even a small mismatch—like a typo, missing prefix, or incorrect ID—can cause the claim to be rejected.
Common Reasons for This Denial
Understanding the root causes helps in faster resolution. Here are the most common reasons:
- Incorrect Patient Name
Spelling errors
Swapped first and last name
Missing suffix (Jr., Sr., III, etc.) - Wrong Member ID
Typographical errors
Using old or inactive policy numbers
Missing prefixes (especially for certain payers) - Date of Birth (DOB) Mismatch
Incorrect format or entry
Data entry errors - Policy Not Active for Date of Service (DOS)
Coverage expired
Service provided outside effective dates - Claim Submitted with Incomplete Information
Missing subscriber details
Incomplete insurance data
Step-by-Step Process to Resolve Denial Code 140
Below is a simplified workflow that mirrors real-world call scenarios:
Step 1: Verify Patient Information
Start by confirming:
Full Name
Date of Birth (DOB)
Social Security Number (if applicable)
Ask the insurance representative to search using these details.
Step 2: Can the Representative Find the Patient?
If YES:
Ask if the claim exists for the Date of Service (DOS)
If claim exists → Follow normal AR (Accounts Receivable) process
If claim does NOT exist → Move to correction steps
If NO:
Request a call reference number
This confirms documentation of the issue
Step 3: Collect Correct Patient Details
If the claim is not found:
Request:
Correct Policy ID
Patient Name (as per insurance)
DOB
Step 4: Verify Policy Dates
Ask for:
Effective Date
Termination Date
Then check:
Does the DOS fall within this period?
If NO:
Claim is invalid for that policy period
Document and obtain call reference number
If YES:
Proceed to next step
Step 5: Check Timely Filing Limit (TFL)
Ask:
What is the TFL for this claim?
Then verify:
Is the claim within the allowed filing period?
If YES:
Request:
Claim mailing address
Payer ID
Fax number
Resubmit the claim with corrected details
If NO:
Ask if Proof of Timely Filing (POTF) is accepted
If YES → Submit claim with proof
If NO → Document and close with reference number
Special Cases and Important Notes
Medicare Claims
Medicare now uses MBI (Medicare Beneficiary Identifier) instead of HIC.
Both formats have 11 characters, but:
HIC: Based on SSN + suffix
MBI: Alphanumeric
Tips:
Ensure exact name match as per Medicare records
Try variations:
Add suffixes (Jr., Sr.)
Swap first and last names if needed
Never bill secondary insurance if Medicare denies due to ID mismatch.
BCBS (Blue Cross Blue Shield)
Requires a 3-letter alpha prefix
Missing prefix = automatic denial
Example:
Prefix varies by state
Some prefixes can be derived using SSN (not always reliable)
Web Portal Verification
Before escalating or resubmitting:
Always check payer portal
Confirm:
Patient eligibility
Policy status
Correct demographic details
Previous Claims Check
Review earlier DOS
Check if:
Payment was received from another insurance
Policy was active previously
If yes, re-verify eligibility and resubmit correctly.
Key Tips to Avoid Denial Code 140
Always verify patient details at registration
Use insurance cards for accurate data entry
Double-check member ID and prefixes
Confirm eligibility before claim submission
Maintain updated payer-specific guidelines
Use clearinghouse edits to catch errors early
Example Scenario
Situation:
A claim is denied because the patient cannot be identified.
Action Taken:
Contact payer and search using Name + DOB
Patient found, but no claim exists
Correct ID obtained
Eligibility confirmed active for DOS
Claim resubmitted with correct details
Result:
Claim processed successfully
Frequently Asked Questions (FAQs)
- What does Denial Code 140 mean?
It means the insurance payer cannot match the patient details submitted with their records. - Can a small spelling mistake cause this denial?
Yes. Even minor errors in name or ID can lead to rejection. - What should I do if the patient is not found?
Request a call reference number and verify details again with the patient or provider. - Can I resubmit the claim?
Yes, if:
The policy is active for DOS
The claim is within TFL - Why is prefix important in BCBS claims?
The prefix identifies the plan and location. Missing it leads to automatic denial.
Conclusion:
Denial Code 140 may seem complex at first, but it is fundamentally a data mismatch issue. With a structured approach—verifying patient details, confirming eligibility, and correcting errors—you can resolve it effectively.
The key is attention to detail. Accurate data entry, proactive verification, and understanding payer-specific rules will significantly reduce such denials.
By following the steps and tips outlined in this guide, even beginners can confidently handle and prevent Denial Code 140, improving claim acceptance rates and overall revenue cycle efficiency.